
Mastering how to floss with braces is quite the task for individuals who are struggling to straighten their teeth. It becomes even more challenging if you are a ‘newcomer’, so to speak. The only questions swarming in your mind are most likely ‘do you have to floss with braces?’ and, if yes, ‘how do you floss with braces?’. Finding an easy way to floss with braces might not be as simple as you’d think if you don’t have the right resources at hand. To put it in a nutshell, the struggle is real when it comes to how to floss teeth with braces. Nevertheless, we have prepared the best tips on how to floss with braces and have wrapped them up in an extensive practical guide for your convenience.
How to Floss with Braces: Step-by-Step Instructions
Prior to getting started with the steps you need to take to master how to floss with braces, we want to make something very clear. No matter how many friends you might have that tell you to forget flossing if you have braces, you should never oversee this aspect of dental care. Flossing is an essential part of maintaining clean and healthy teeth. If you have braces, it becomes even more important. Just think about all the tiny pieces of food that can get stuck in your wires. Not that much of a pretty picture, is it? Don’t take your investment for granted.

Now that we have that all cleared up, let’s proceed with the actual steps you have to go through. We will start off by explaining how to floss with braces using normal dental floss. If you want to make things easier, you can opt for one of the tools we speak about in the second section of our guide. If you want to stick to good old classic dental floss, this is what you need to do.
4 Steps for Flossing with Braces
Make sure that you have plenty of dental floss available so you can get the job done properly. In most cases, you will need about 18 inches of dental floss, but you should always have some for backup in case you’re in a sticky situation. We strongly recommend that you use dental floss without any wax coating so it won’t get stick in your wire.
In addition to this, you also need to make sure that you have enough time to floss correctly. Even though flossing poorly is better than not doing it at all, you should be extra careful when flossing with braces. Please note that it might take double or triple the average time spent flossing your teeth without braces, so make time to take care of yourself.
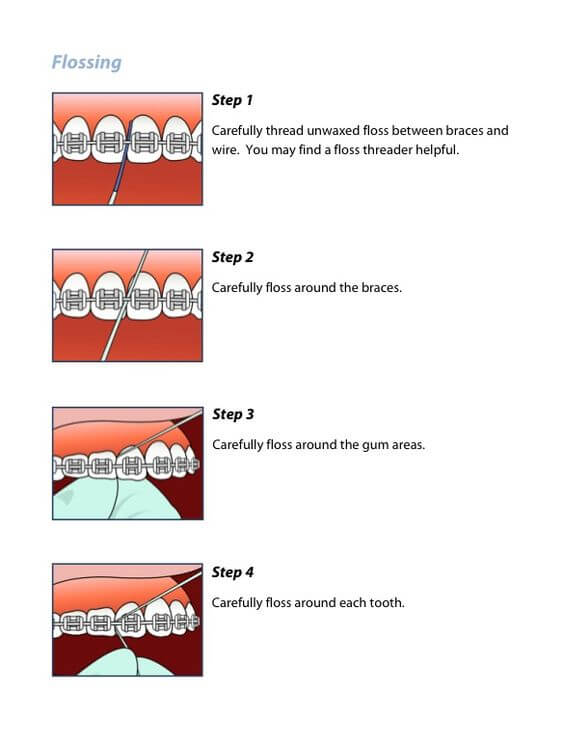
Step 1: Thread
This will be a little tricky at first, at least until you get the hang of it. Gently thread the floss in the space between your wire and teeth and between your braces. The process is quite similar to threading a needle, and it also requires almost the same amount of patience. Don’t get frustrated if you don’t succeed in threading the floss from your first try. If you feel that you need some extra help, consider getting a floss threader.
Step 2: Floss around Braces
Now that your thread is properly between your wire and teeth, start the flossing process around your braces. You will be rather surprised to notice how many traces of food will pop out from your braces. Make sure you floss all around each one, insisting on the sides and the top and bottom.
Step 3: Floss around Gums
After you free your braces of any food that got stuck up in there, you can start flossing around your gums as you normally would. Gently push the floss up at the top of each tooth, easing into the gum by making a ‘C’ shape. If you haven’t flossed that much up until this point, you might experience a bit of blood. This is a sign that you need to take extra care and floss often. This also might mean that you are pushing the dental floss into your gums too hard, so make sure that you are gentle.
Step 4: Floss around Teeth
Last but not least, take every tooth and floss all around. Make sure that you don’t neglect your molars, or any other tooth, for that matter. Food can get stuck anywhere between your teeth, especially in the back where you tend to chew the most.
As we previously mentioned, you need to be even more patient than usual when learning how to floss with braces. It might take even more time than you expected during the first week, but it should all be smooth sailing once it becomes a habit for you. If you have any troubles flossing with your braces, kindly ask your orthodontist to help you out with some hands-on tips when you go for a checkup.
4 Tools to Easily Floss with Braces
Using normal dental floss is the most cost-effective and accessible method on how to floss with braces. However, that doesn’t stop you from experimenting with a few products on the market that can make everything a lot easier.
1. Dental Floss Braces Threader
One of the most common tools for making flossing with braces a lot easier is a floss threader. It looks like a needle, but it’s actually from plastic and helps you get the thread behind your wire a lot easier. Here are the steps you need to carry out for using a floss threader:
- Take a long piece of floss and thread it through the eye of your floss threader.
- After that, start flossing as you normally would.
- Don’t forget to floss your braces and around your gums and teeth.
2. Waterpik (Water Flosser)
Another awesome tool that has become more and more popular recently is a waterpik, also known as a water flosser. The device is actually similar to those you can find at your orthodontist. To put things shortly, water under pressure washes the food away from in between your braces and teeth. You can buy a device like this online or at most health care stores.
3. Proxy Brush
A proxy brush can save you a lot of time, money and energy wasted trying to learn how to floss with braces. It might not be as easy to find and buy as a waterpik, but you can ask your orthodontist and maybe even he or she can provide you with one. Using a proxy brush with braces is extremely simple. All you have to do is push it up in the space under your wire against your teeth and gently scrape the food residue away.
4. Dental Tape
While highly similar to normal dental floss, dental tape can be used as a special floss for braces for those who seek ease. Some people might find the process painful with normal floss, so look into dental tape option at your local stores.
Tips on How to Floss with a Permanent Retainer
Flossing with a permanent retainer is very much like flossing with braces, just that you don’t have two large wires on your top and bottom rows of teeth to thread through. In this case, you just have the small wire on the inside part of your bottom row that you need to get through. Nevertheless, this doesn’t mean that you should spend any less time flossing with a permanent retainer than you would with braces. Make sure you successfully thread the dental floss under your retainer and work your way around each tooth.
Extra Tips for Dental Care with Braces
Now that you have the answer to ‘how do I floss with braces?’, we will go through a few general steps for maintaining dental hygiene with proper care tips. These apply to all individuals who have braces or permanent retainers:
- Consider investing in an orthodontist toothbrush to help get food out from your braces.
- Carry floss with you to clean up in between meals.
- Spend the right amount of time for both brushing your teeth and flossing.
- Apply lip balm whenever you feel your lips get chapped as a result of having braces.
- Use a small piece of wax if your wire or one of your braces ever breaks.
Conclusion
We hope that these step-by-step instructions will make everything seem like a breeze and help you easily floss with braces. Purchase the recommended tools, and after your first, two or three times, you will actually see that it is easy-peasy. If you wear a permanent retainer, we hope that the tips on how to floss with a permanent retainer were useful. What was your experience with flossing with braces? Leave us a comment below! We’d love to hear from you!
Leave a Comment